Linux 安装 Logstash
Logstash
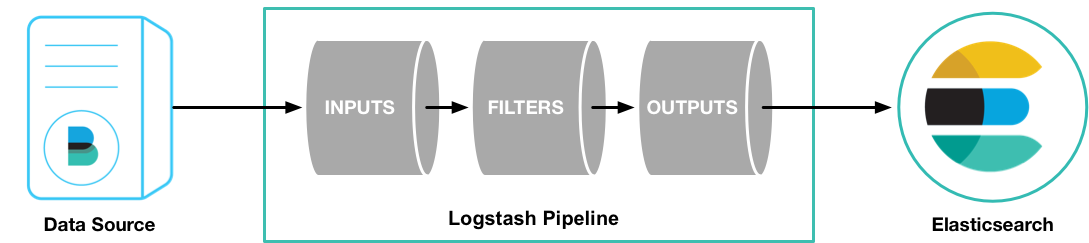
Logstash 是 Elasticsearch 下的一款开源软件,它能够同时从多个来源采集数据、转换数据,然后将数据发送到Eleasticsearch 中创建索引。
下载安装
Logstash 的下载界面:Download Logstash
这里我下载对应的压缩包,然后进行解压:
tar -xzvf logstash-7.6.2.tar.gz
进入解压之后的目录

配置
想要实现从 mysql 数据库中需要在 Logstash 安装目录下的 config 目录中建立如下的配置文件:
input {
  stdin {
  }
  jdbc {
  jdbc_connection_string => "jdbc:mysql://192.168.116.129:3306/xedu_course?useUnicode=true&characterEncoding=utf-8&useSSL=true&serverTimezone=UTC"
  # the user we wish to excute our statement as
  jdbc_user => "root"
  jdbc_password => "pwd"
  # the path to our downloaded jdbc driver
  jdbc_driver_library => "/home/wx/mysql-connector-java-8.0.19.jar"
  # the name of the driver class for mysql
  jdbc_driver_class => "com.mysql.jdbc.Driver"
  jdbc_paging_enabled => "true"
  jdbc_page_size => "50000"
  #要执行的sql文件
  #statement_filepath => "/conf/course.sql"
  statement => "select * from course_pub where timestamp > date_add(:sql_last_value,INTERVAL 8 HOUR)"
  #定时配置
  schedule => "* * * * *"
  record_last_run => true
  last_run_metadata_path => "/home/wx/logstash-7.6.2/config/logstash_metadata"
  }
}


output {
  elasticsearch {
  #ES的ip地址和端口
  hosts => "localhost:9200"
  #hosts => ["localhost:9200","localhost:9202","localhost:9203"]
  #ES索引库名称
  index => "xedu_course"
  document_id => "%{id}"
  }
  stdout {
 #日志输出
  codec => json_lines
  }
}
启动运行
在安装目录下执行如下的操作启动 Logstash
bin/logstash -f config/mysql.conf
成功启动之后 Logstash 便会自动的将 mysql 数据库中的数据插入到 Elasticsearch 中。
查看作者信息